12.7: Phenomena Related to Refraction
By: Jeremy Trendoff
Nature has lots of interesting phenomena involving light. Geometric Optics are useful tools to help explain some of this phenomena.
What is Refraction?
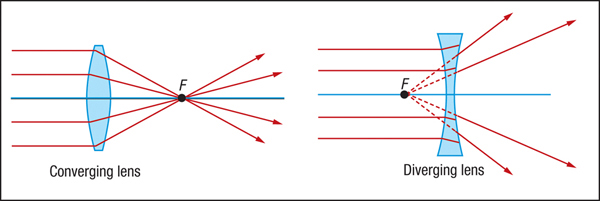
Refraction is the bending of light when light travels from one medium to another. The ray that is shown at a "bend" is called the refracted ray. The angle of refraction is the angle between the refracted ray and the normal.
Because the speed of light changes depending on the medium the light is passing through there are two statements that remain true in every scenario of refraction. They are called the Rules of Refraction.
The Rules of Refraction
1) The incident ray, refracted ray, and the normal all lie in the same plane. The incident ray and refracted ray are on the opposite sides of the line that separates the two media.
2) Light bends towards the normal when the density of the path of light becomes more dense and light bends away from the normal when the density decreases. This happens because the more dense the shape, the harder it is for light to pass through.
Apparent Depth
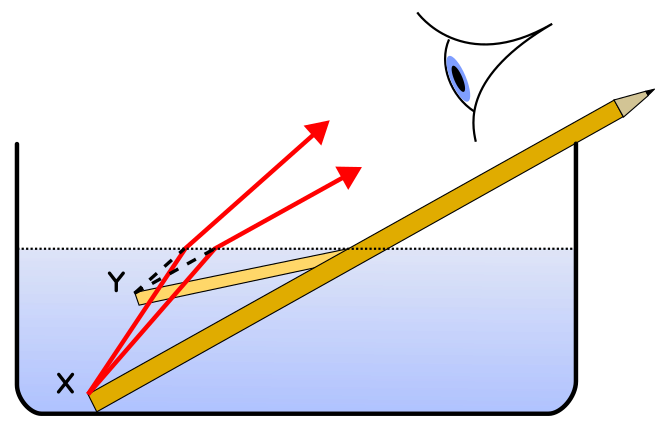
When you look at a pencil that is partially under water, it appears bent when viewed from above.
We can explain why this happens using the concept of refraction and the knowledge that our brains perceive that light travels in a straight line. Light from the pencil reaches your eyes and your brain projects the rays backwards in a straight line, thus, creating a virtual image in the water. The virtual image is actually projected higher than the actual pencil tip making it seem that the pencil is bent. The distance from the surface of the water to the where the object appears to be is called the apparent depth.
Objects under water always appear to be closer to the surface than they actually are for the same reason that people's legs seem smaller in water. Apparent depth is ultimately an optical illusion.
To get a better understanding of apparent depth, click
HERE for a educational video.
The "Flattened" Sun
Sunset offers a unique opportunity to see the sun unusually due to refraction. People notice that, when the sun is near the horizon, it appears to be flattened. Of course, the sun is really not flattened at all. When the sun is close to the horizon, light is refracted from the bottom of the sun more than the light from the top. Part of the reason for this is that light is more dense towards the earth's surface than higher up in the atmosphere. So the increased density results in a greater bend of the light rays. In addition, the rays at the bottom of the sun have a greater angle of incidence. This results in the sun appearing flattened.
There is also another way that we perceive the sun that is all due to refraction. To learn more about this, please click on the link
HERE that will take you to a video.
A Mirage
A mirage is a
virtual image that forms as a
result of refraction and total internal reflection in the earth's atmosphere. As you look at a mirage you will notice that the image appears to be quite close. However, as you walk towards it, it will always seem to be in front of you no matter how far you walk.
A mirage can appear when light is
travelling from cool air to warmer air. The index of refraction for air
decreases as the air gets warmer. When the air reaches its lowest (hottest) air layer, total eternal refraction occurs. The light ray will now travel up from that layer into cooler air and the light is gradually refracted. Eventually, the light will enter your eyes creating a virtual image. In reality, that pool of water is a
virtual image of the sky projected onto the ground. This happens because the
brain perceives light to travel in a straight line.
Shimmering
Similar to a mirage, shimmering of the moon on the water's surface is caused by the movement of light through air at different temperatures.
At night, the air above the water is much warmer than the air further away from the water's surface. Moonlight passes through layers of air at different temperatures and, in the coolest layer, light travels slowly and the light starts to bend towards the normal. As the light ray continues to travel downwards towards the warmest layer, its speed increases. So the light ray bends further and further from the normal. Eventually, total internal refraction will occur in the lowest (warmest) layer causing multiple virtual images of the moon to be projected on to the water's surface creating that iconic image of the moon shimmering on the water.
The Rainbow
Earlier in this unit we learned about how prisms are used to separate white light into a continuous sequence of colours. The separation of light is called
dispersion. Dispersion occurs because of colour
travelling at a different speed through a prism. The rainbow is a phenomena that is produced by
water droplets in the earth's atmosphere.
There are three steps involved in the process of creating a rainbow. They are as follows:
Step 1) The refraction of light as light enters the raindrop (going from air into water), resulting in dispersion to occur.
Step 2) Partial internal reflection when this light hits the back of the raindrop.
Step 3) Refraction as the light now exits the raindrop (going from water to air).
This is the light that your eyes see, which you perceive as a rainbow. Your brain projects these light rays backwards and forms a virtual image of the spectrum of light -- a rainbow.
For a detailed video on the formation of rainbows, click
HERE.